RConsole - native = CMD/Befehle
PowerShell - native = Powershell
INI - native = INI Files
RConsole - native = CMD/Befehle
PowerShell - native = Powershell
INI - native = INI Files
vim ~/.bash_aliases
1 2 | alias kp="pgrep python | xargs sudo kill" alias tp="top -b -n1 | grep python" |
1 2 3 4 5 6 7 8 9 10 11 12 13 14 15 16 17 18 19 20 21 22 23 24 25 26 27 28 29 30 31 32 33 34 35 36 37 38 39 40 41 42 43 44 45 46 47 48 49 50 51 52 53 54 55 56 | function Get-IniFile { param( [parameter(Mandatory = $true)] [string] $filePath ) $anonymous = "NoSection" $ini = @{} switch -regex -file $filePath { "^\[(.+)\]$" # Section { $section = $matches[1] $ini[$section] = @{} $CommentCount = 0 } "^(;.*)$" # Comment { if (!($section)) { $section = $anonymous $ini[$section] = @{} } $value = $matches[1] $CommentCount = $CommentCount + 1 $name = "Comment" + $CommentCount $ini[$section][$name] = $value } "(.+?)\s*=\s*(.*)" # Key { if (!($section)) { $section = $anonymous $ini[$section] = @{} } $name,$value = $matches[1..2] $ini[$section][$name] = $value } } return $ini } $iniFile = Get-IniFile "c:\info\additional_info.ini" $PreferredSSID = $iniFile.NoSection.SerialNumber Function AutoConnect ($PreferredSSID){ #WIFI auto-connect if($PreferredSSID -ne $null){ if(Get-NetAdapter | where {($_.Name -like "*wi-fi*" -or $_.Name -like "*wifi*") -and ($_.Status -eq "Disconnected")}){ netsh wlan connect name=$PreferredSSID Start-Sleep -Seconds 2 netsh wlan set profileparameter name=$PreferredSSID connectionmode=auto } } } while ( Get-NetAdapter | where {($_.Name -like "*wi-fi*" -or $_.Name -like "*wifi*") -and ($_.Status -eq "Disconnected")}){ AutoConnect $PreferredSSID Start-Sleep -Seconds 2 } |
additional_ino.ini file:
1 2 | SerialNumber = 35356345601 CalibrationDate = 22 Oct 2010 |
1 2 3 4 5 6 7 8 9 10 11 12 13 14 15 16 17 18 19 20 21 22 23 24 25 26 27 28 29 30 31 32 33 34 35 36 37 38 39 40 41 42 43 44 45 46 47 48 49 50 51 52 53 54 55 56 57 58 59 60 61 62 63 64 65 66 67 68 69 70 71 72 73 74 75 76 77 78 79 80 81 82 83 84 85 86 87 88 89 | function Get-IniFile { param( [parameter(Mandatory = $true)] [string] $filePath ) $anonymous = "NoSection" $ini = @{} switch -regex -file $filePath { "^\[(.+)\]$" # Section { $section = $matches[1] $ini[$section] = @{} $CommentCount = 0 } "^(;.*)$" # Comment { if (!($section)) { $section = $anonymous $ini[$section] = @{} } $value = $matches[1] $CommentCount = $CommentCount + 1 $name = "Comment" + $CommentCount $ini[$section][$name] = $value } "(.+?)\s*=\s*(.*)" # Key { if (!($section)) { $section = $anonymous $ini[$section] = @{} } $name,$value = $matches[1..2] $ini[$section][$name] = $value } } return $ini } $iniFile = Get-IniFile "c:\info\additional_info.ini" $SSID = $iniFile.NoSection.SerialNumber $profilefile = "$Env:USERPROFILE\AppData\Roaming\info\" + $SSID + "-WLANProfile.xml" $PW = $SSID $SSIDHEX=($SSID.ToCharArray() |foreach-object {'{0:X}' -f ([int]$_)}) -join'' $xmlfile="<?xml version=""1.0""?> <WLANProfile xmlns=""http://www.microsoft.com/networking/WLAN/profile/v1""> <name>$SSID</name> <SSIDConfig> <SSID> <hex>$SSIDHEX</hex> <name>$SSID</name> </SSID> </SSIDConfig> <connectionType>ESS</connectionType> <connectionMode>auto</connectionMode> <MSM> <security> <authEncryption> <authentication>WPAPSK</authentication> <encryption>AES</encryption> <useOneX>false</useOneX> </authEncryption> <sharedKey> <keyType>passPhrase</keyType> <protected>false</protected> <keyMaterial>$PW</keyMaterial> </sharedKey> </security> </MSM> </WLANProfile> " $XMLFILE > ($profilefile) netsh wlan delete profile name=* netsh wlan add profile filename="$($profilefile)" netsh wlan show profiles $SSID key=clear netsh wlan connect name=$SSID |
1 2 | SerialNumber = 35356345601 CalibrationDate = 22 Oct 2010 |
1 | CreateObject("Wscript.Shell").Run "powershell -EP ByPass -NoP -File C:\checkCalibration_all.ps1", 0, False |
1 2 3 4 5 6 7 8 9 10 11 12 13 14 15 16 17 18 19 20 21 22 23 24 25 26 27 28 29 30 31 32 33 34 35 36 37 38 39 40 41 42 43 44 45 46 47 48 49 50 51 52 53 54 55 56 57 58 59 60 61 62 63 64 65 66 67 68 69 70 71 72 73 74 75 76 77 78 79 80 81 82 83 84 85 86 87 88 89 90 91 92 93 94 95 96 97 98 99 100 101 102 103 104 105 106 107 108 109 110 111 112 113 114 115 116 117 118 | param($date = (Get-Date)) function Get-IniFile { param( [parameter(Mandatory = $true)] [string] $filePath ) $anonymous = "NoSection" $ini = @{} switch -regex -file $filePath { "^\[(.+)\]$" # Section { $section = $matches[1] $ini[$section] = @{} $CommentCount = 0 } "^(;.*)$" # Comment { if (!($section)) { $section = $anonymous $ini[$section] = @{} } $value = $matches[1] $CommentCount = $CommentCount + 1 $name = "Comment" + $CommentCount $ini[$section][$name] = $value } "(.+?)\s*=\s*(.*)" # Key { if (!($section)) { $section = $anonymous $ini[$section] = @{} } $name,$value = $matches[1..2] $ini[$section][$name] = $value } } return $ini } $iniFile = Get-IniFile "$Env:USERPROFILE\AppData\Roaming\info.ini" $addIniFile = Get-IniFile "C:\info\additional_info.ini" $language = $iniFile.General.language $calidateIni = $addIniFile.NoSection.CalibrationDate Add-Type -AssemblyName System.Windows.Forms $calidate = [Datetime]::ParseExact($calidateIni, 'dd MMM yyyy', [CultureInfo]'en-us') #' ' #'This is in the additional info.txt = ' + $calidate.AddDays(365) #'This is the date now = ' + $date #' ' if ($calidate -as [DateTime]) { if ($date -ge $calidate.AddDays(365)) { #'Date now is bigger than calidate' #$language if ($language -eq "de") { #echo $language [System.Windows.Forms.MessageBox]::Show("Service fällig.","Info",0) } elseif ($language -eq "en") { [System.Windows.Forms.MessageBox]::Show("Service due.","Info",0) } elseif ($language -eq "fr") { [System.Windows.Forms.MessageBox]::Show("Service dû","Info",0) } elseif ($language -eq "ja") { [System.Windows.Forms.MessageBox]::Show("校正有効期限が失効しました","Info",0) } } elseif ($date -ge $calidate.AddDays(335)) { #'Date now is in 30 days or less than calidate' $diffdate = New-TimeSpan -Start $date -End $calidate.AddDays(365) #'Calidate + 365 = ' + $calidate.AddDays(365) #'This is the date now = ' + $date #"Service fällig in = " + $diffdate.Days + " Tagen" if ($language -eq "de") { [System.Windows.Forms.MessageBox]::Show("Service fällig in " + $diffdate.Days + " Tagen","Info",0) } elseif ($language -eq "en") { [System.Windows.Forms.MessageBox]::Show("Service due in " + $diffdate.Days + " days","Info",0) } elseif ($language -eq "fr") { [System.Windows.Forms.MessageBox]::Show("Prochain service dans " + $diffdate.Days + " jour(s).","Info",0) } elseif ($language -eq "ja") { [System.Windows.Forms.MessageBox]::Show("校正有効期限失効まであと " + $diffdate.Days + " 日","Info",0) } } else { #'no' #[System.Windows.Forms.MessageBox]::Show("Calibration is ok","Info",0) #[string]$linesplit[1] #$date } } |
1 2 3 4 5 6 7 8 9 10 11 12 13 | [Unit] Description=Copy user wpa_supplicant.conf ConditionPathExists=/boot/wpa_supplicant.conf Before=dhcpcd.service [Service] Type=oneshot RemainAfterExit=yes ExecStart=/bin/mv /boot/wpa_supplicant.conf /etc/wpa_supplicant/wpa_supplicant.conf ExecStartPost=/bin/chmod 600 /etc/wpa_supplicant/wpa_supplicant.conf [Install] WantedBy=multi-user.target |
Über serielles Terminal (USB-Kabel) auf pi einloggen. Falls WLAN Hotspot bereits existiert, dann mit dem PC sich damit verbinden und ein SSH Terminal Sitzung zum WLAN 192.168.8.1 verbinden. Dann die folgendes eingeben:
1 2 | Sudo touch /usr/share/network-conf/ap/iptables.up.rules sudo turn-wifi-into-apmode yes |
SSID und Passwort eingeben:
default: SSID=sensor-xx PASSWORD=123456789
# Wifi Hotspot am PC einrichten
# Über serielles Terminal auf pi einloggen, dann
1 2 | sudo nmcli dev wifi sudo nmcli dev wifi connect "SSID" password "PASSWORD" ifname wlan0 |
# die Einstellungen werden gespeichert und auch nach Neustart wird Verbindung aufgebaut.
1 | sudo nmcli dev
|
#if the status of a device is "unmanaged" it means that device cannot be accessed by NetworkManager. To make it accessed you need to clear the settings under "/etc/network/interfaces" and reboot your system.
1 2 3 | sudo nmcli r wifi on sudo nmcli dev wifi sudo nmcli dev wifi connect "SSID" password "PASSWORD" ifname wlan0 |
Just include your .ini file into bash body:
File example.ini:
1 2 3 | DBNAME=test DBUSER=scott DBPASSWORD=tiger |
File example.sh
1 2 3 4 5 | #!/bin/bash #Including .ini file . example.ini #Test echo "${DBNAME} ${DBUSER} ${DBPASSWORD}" |
[ Source: https://stackoverflow.com/questions/6318809/how-do-i-grab-an-ini-value-within-a-shell-script ]
At times you create a script and then you want to have the scripts controlled by systemd or in some cases you wish to have the scripts getting restarted by itself when it is killed due to some reason. In such cases systemd in Linux helps to configure services which can be managed. To do so follow the following steps.
1 | cd /etc/systemd/system
|
1 2 3 4 5 6 7 8 9 10 11 | [Unit] Description=<description about this service> [Service] User=<user e.g. root> WorkingDirectory=<directory_of_script e.g. /root> ExecStart=<script which needs to be executed> Restart=always [Install] WantedBy=multi-user.target |
1 | sudo systemctl daemon-reload
|
1 | sudo systemctl start your-service.service
|
1 | sudo systemctl status your-service.service
|
1 | sudo systemctl enable your-service.service
|
1 | sudo systemctl disable your-service.service
|
[ Source: https://www.shubhamdipt.com/blog/how-to-create-a-systemd-service-in-linux/]
it Kimai wird der langweilige Prozess Excel Tabellen mit Ihren Arbeitszeiten zu füttern nicht nur vereinfacht, es bietet auch noch dutzende weiterer spannender Funktionen, von denen Sie bisher noch nicht mal wussten, das Sie sie bisher schmerzlich vermissen!
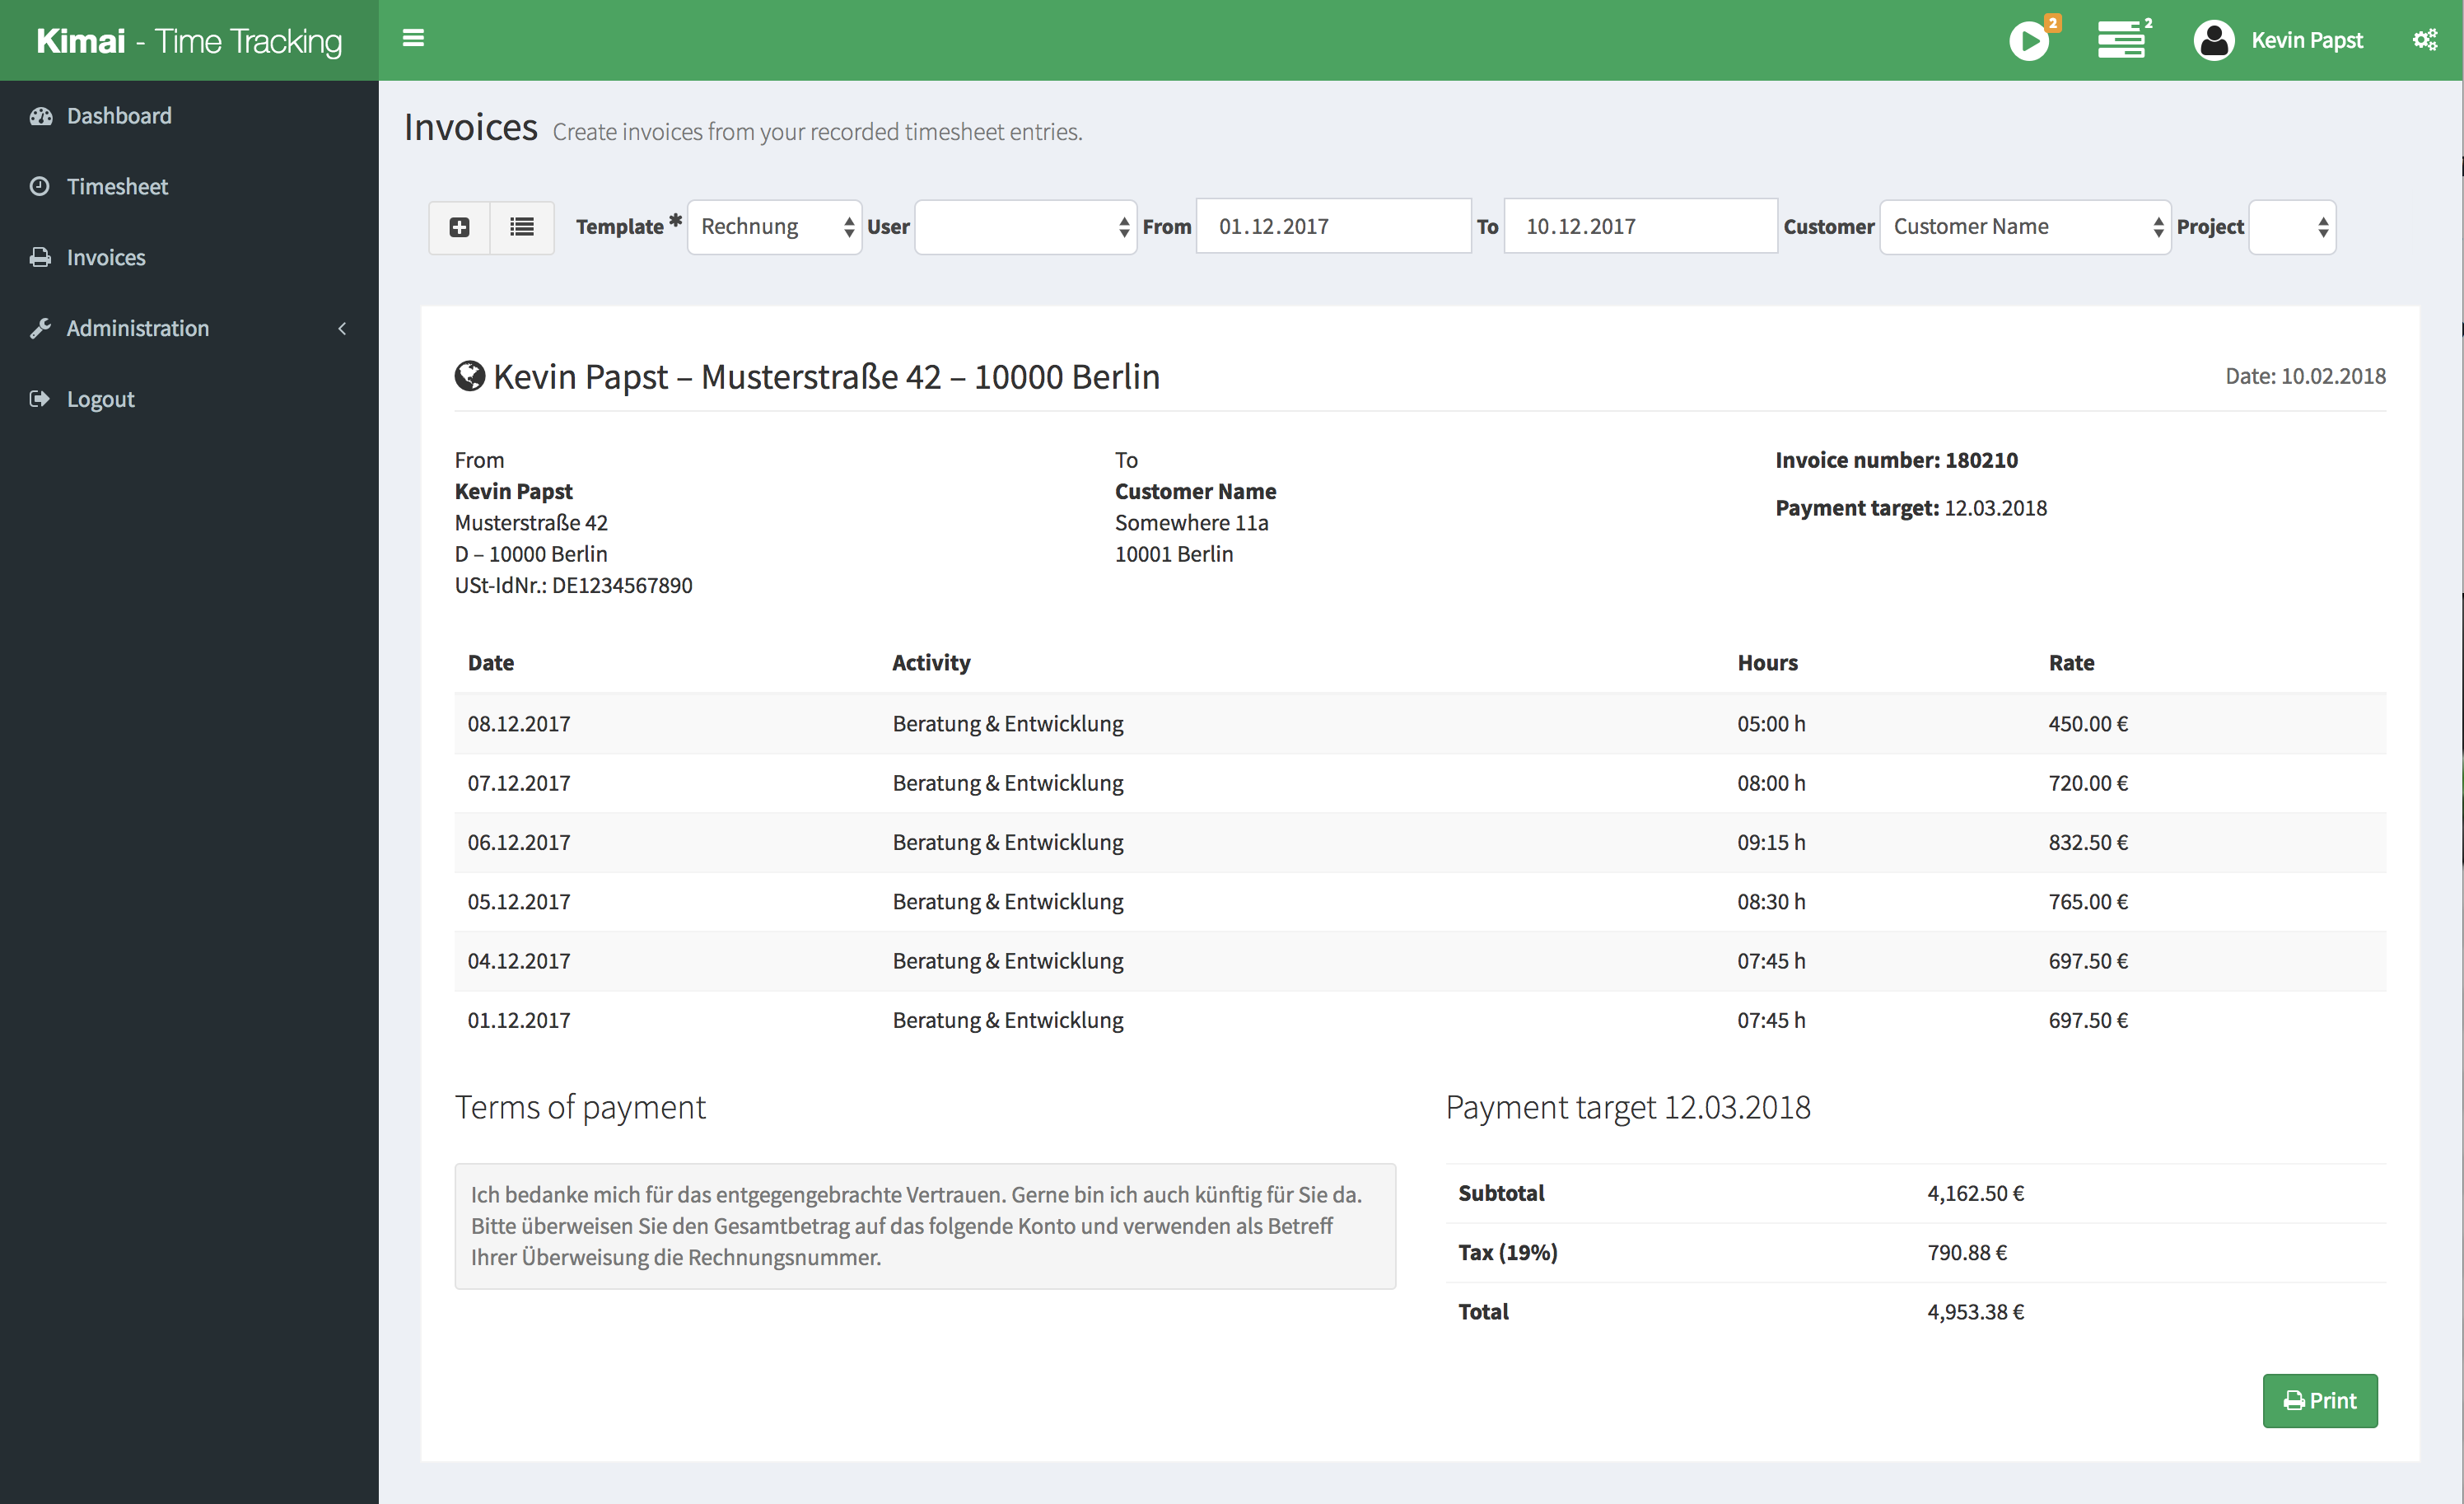

Kimai muss während der Aufnahme nicht laufen, Sie können sogar Ihren Browser beenden. Ihre Zeit wird noch aufgezeichnet, bis Sie sie von einem Webbrowser aus stoppen, welcher Zugriff auf Ihre Installation hat. Kimai ist für viele Benutzer ausgelegt, aber Sie können es auch für einen einzelnen Benutzer verwenden, ganz wie Sie möchten.
[ Source: https://www.kimai.org/de/ ]
his module provides control of the MicroPython LCD160CR display.
Further resources are available via the following links:
LCD160CRv1.0 reference manual (100KiB PDF)
LCD160CRv1.0 schematics (1.6MiB PDF)
The LCD160CR class provides an interface to the display. Create an instance of this class and use its methods to draw to the LCD and get the status of the touch panel.
For example:
import lcd160cr

lcd = lcd160cr.LCD160CR('X')
lcd.set_orient(lcd160cr.PORTRAIT)
lcd.set_pos(0, 0)
lcd.set_text_color(lcd.rgb(255, 0, 0), lcd.rgb(0, 0, 0))
lcd.set_font(1)
lcd.write('Hello MicroPython!')
print('touch:', lcd.get_touch())
lcd160cr.LCD160CR(connect=None, *, pwr=None, i2c=None, spi=None, i2c_addr=98)Construct an LCD160CR object. The parameters are:
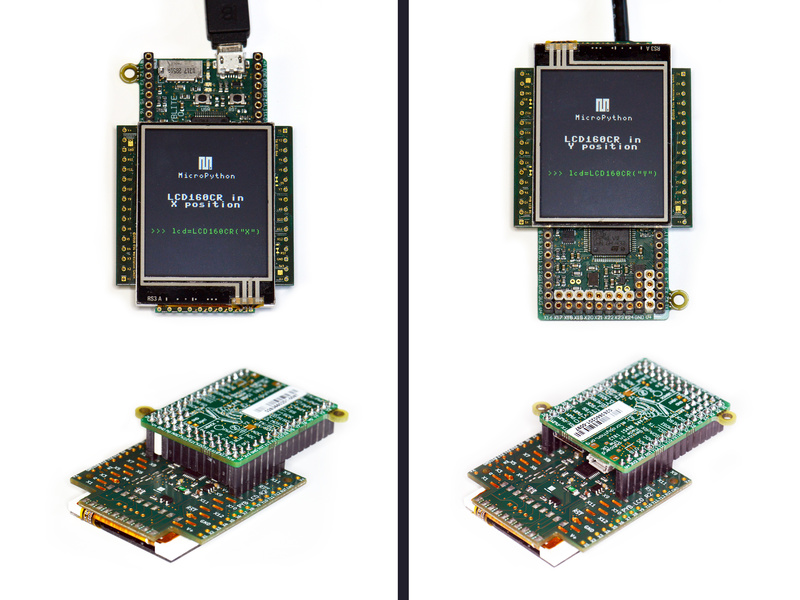
connect is a string specifying the physical connection of the LCD display to the board; valid values are “X”, “Y”, “XY”, “YX”. Use “X” when the display is connected to a pyboard in the X-skin position, and “Y” when connected in the Y-skin position. “XY” and “YX” are used when the display is connected to the right or left side of the pyboard, respectively.
pwr is a Pin object connected to the LCD’s power/enabled pin.
i2c is an I2C object connected to the LCD’s I2C interface.
spi is an SPI object connected to the LCD’s SPI interface.
i2c_addr is the I2C address of the display.
One must specify either a valid connect or all of pwr, i2c and spi.
If a valid connect is given then any of pwr, i2c or spi which are
not passed as parameters (i.e. they are None) will be created based on the
value of connect. This allows to override the default interface to the
display if needed.
The default values are:
“X” is for the X-skin and uses:
pwr=Pin("X4"),i2c=I2C("X"),spi=SPI("X")“Y” is for the Y-skin and uses:
pwr=Pin("Y4"),i2c=I2C("Y"),spi=SPI("Y")“XY” is for the right-side and uses:
pwr=Pin("X4"),i2c=I2C("Y"),spi=SPI("X")“YX” is for the left-side and uses:
pwr=Pin("Y4"),i2c=I2C("X"),spi=SPI("Y")
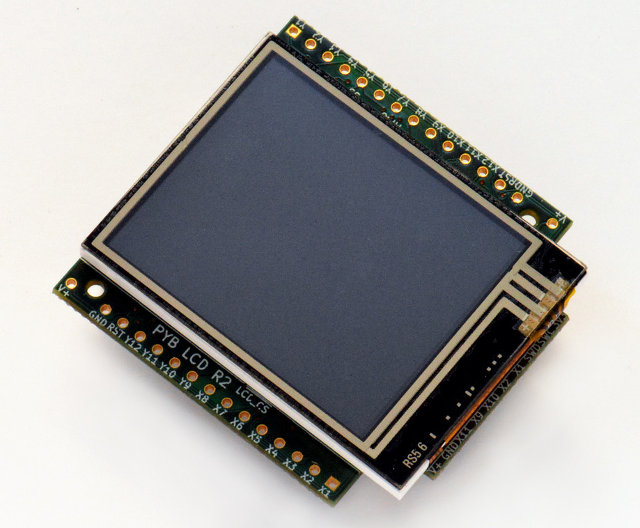
See this image for how the display can be connected to the pyboard.
LCD160CR.rgb(r, g, b)Return a 16-bit integer representing the given rgb color values. The
16-bit value can be used to set the font color (see
LCD160CR.set_text_color()) pen color (see LCD160CR.set_pen())
and draw individual pixels.
LCD160CR.clip_line(data, w, h):Clip the given line data. This is for internal use.
The following instance members are publicly accessible.
LCD160CR.wLCD160CR.hThe width and height of the display, respectively, in pixels. These
members are updated when calling LCD160CR.set_orient() and should
be considered read-only.
LCD160CR.set_power(on)Turn the display on or off, depending on the given value of on: 0 or False
will turn the display off, and 1 or True will turn it on.
LCD160CR.set_orient(orient)Set the orientation of the display. The orient parameter can be one
of PORTRAIT, LANDSCAPE, PORTRAIT_UPSIDEDOWN, LANDSCAPE_UPSIDEDOWN.
LCD160CR.set_brightness(value)Set the brightness of the display, between 0 and 31.
LCD160CR.set_i2c_addr(addr)Set the I2C address of the display. The addr value must have the lower 2 bits cleared.
LCD160CR.set_uart_baudrate(baudrate)Set the baudrate of the UART interface.
LCD160CR.set_startup_deco(value)Set the start-up decoration of the display. The value parameter can be a
logical or of STARTUP_DECO_NONE, STARTUP_DECO_MLOGO, STARTUP_DECO_INFO.
LCD160CR.save_to_flash()Save the following parameters to flash so they persist on restart and power up: initial decoration, orientation, brightness, UART baud rate, I2C address.
The following methods manipulate individual pixels on the display.
LCD160CR.set_pixel(x, y, c)Set the specified pixel to the given color. The color should be a 16-bit
integer and can be created by LCD160CR.rgb().
LCD160CR.get_pixel(x, y)Get the 16-bit value of the specified pixel.
LCD160CR.get_line(x, y, buf)Low-level method to get a line of pixels into the given buffer. To read n pixels buf should be 2*n+1 bytes in length. The first byte is a dummy byte and should be ignored, and subsequent bytes represent the pixels in the line starting at coordinate (x, y).
LCD160CR.screen_dump(buf, x=0, y=0, w=None, h=None)Dump the contents of the screen to the given buffer. The parameters x and y
specify the starting coordinate, and w and h the size of the region. If w
or h are None then they will take on their maximum values, set by the size
of the screen minus the given x and y values. buf should be large enough
to hold 2*w*h bytes. If it’s smaller then only the initial horizontal lines
will be stored.
LCD160CR.screen_load(buf)Load the entire screen from the given buffer.
To draw text one sets the position, color and font, and then uses
LCD160CR.write to draw the text.
LCD160CR.set_pos(x, y)Set the position for text output using LCD160CR.write(). The position
is the upper-left corner of the text.
LCD160CR.set_text_color(fg, bg)Set the foreground and background color of the text.
LCD160CR.set_font(font, scale=0, bold=0, trans=0, scroll=0)Set the font for the text. Subsequent calls to write will use the newly
configured font. The parameters are:
font is the font family to use, valid values are 0, 1, 2, 3.
scale is a scaling value for each character pixel, where the pixels are drawn as a square with side length equal to scale + 1. The value can be between 0 and 63.
bold controls the number of pixels to overdraw each character pixel, making a bold effect. The lower 2 bits of bold are the number of pixels to overdraw in the horizontal direction, and the next 2 bits are for the vertical direction. For example, a bold value of 5 will overdraw 1 pixel in both the horizontal and vertical directions.
trans can be either 0 or 1 and if set to 1 the characters will be drawn with a transparent background.
scroll can be either 0 or 1 and if set to 1 the display will do a soft scroll if the text moves to the next line.
LCD160CR.write(s)Write text to the display, using the current position, color and font. As text is written the position is automatically incremented. The display supports basic VT100 control codes such as newline and backspace.
Primitive drawing commands use a foreground and background color set by the
set_pen method.
LCD160CR.set_pen(line, fill)Set the line and fill color for primitive shapes.
LCD160CR.erase()Erase the entire display to the pen fill color.
LCD160CR.dot(x, y)Draw a single pixel at the given location using the pen line color.
LCD160CR.rect(x, y, w, h)LCD160CR.rect_outline(x, y, w, h)LCD160CR.rect_interior(x, y, w, h)Draw a rectangle at the given location and size using the pen line
color for the outline, and the pen fill color for the interior.
The rect method draws the outline and interior, while the other methods
just draw one or the other.
LCD160CR.line(x1, y1, x2, y2)Draw a line between the given coordinates using the pen line color.
LCD160CR.dot_no_clip(x, y)LCD160CR.rect_no_clip(x, y, w, h)LCD160CR.rect_outline_no_clip(x, y, w, h)LCD160CR.rect_interior_no_clip(x, y, w, h)LCD160CR.line_no_clip(x1, y1, x2, y2)These methods are as above but don’t do any clipping on the input coordinates. They are faster than the clipping versions and can be used when you know that the coordinates are within the display.
LCD160CR.poly_dot(data)Draw a sequence of dots using the pen line color. The data should be a buffer of bytes, with each successive pair of bytes corresponding to coordinate pairs (x, y).
LCD160CR.poly_line(data)Similar to LCD160CR.poly_dot() but draws lines between the dots.
LCD160CR.touch_config(calib=False, save=False, irq=None)Configure the touch panel:
If calib is
Truethen the call will trigger a touch calibration of the resistive touch sensor. This requires the user to touch various parts of the screen.If save is
Truethen the touch parameters will be saved to NVRAM to persist across reset/power up.If irq is
Truethen the display will be configured to pull the IRQ line low when a touch force is detected. If irq isFalsethen this feature is disabled. If irq isNone(the default value) then no change is made to this setting.
LCD160CR.is_touched()Returns a boolean: True if there is currently a touch force on the screen,
False otherwise.
LCD160CR.get_touch()Returns a 3-tuple of: (active, x, y). If there is currently a touch force on the screen then active is 1, otherwise it is 0. The x and y values indicate the position of the current or most recent touch.
LCD160CR.set_spi_win(x, y, w, h)Set the window that SPI data is written to.
LCD160CR.fast_spi(flush=True)Ready the display to accept RGB pixel data on the SPI bus, resetting the location
of the first byte to go to the top-left corner of the window set by
LCD160CR.set_spi_win().
The method returns an SPI object which can be used to write the pixel data.
Pixels should be sent as 16-bit RGB values in the 5-6-5 format. The destination
counter will increase as data is sent, and data can be sent in arbitrary sized
chunks. Once the destination counter reaches the end of the window specified by
LCD160CR.set_spi_win() it will wrap around to the top-left corner of that window.
LCD160CR.show_framebuf(buf)Show the given buffer on the display. buf should be an array of bytes containing
the 16-bit RGB values for the pixels, and they will be written to the area
specified by LCD160CR.set_spi_win(), starting from the top-left corner.
The framebuf module can be used to construct frame buffers and provides drawing primitives. Using a frame buffer will improve performance of animations when compared to drawing directly to the screen.
LCD160CR.set_scroll(on)Turn scrolling on or off. This controls globally whether any window regions will scroll.
LCD160CR.set_scroll_win(win, x=- 1, y=0, w=0, h=0, vec=0, pat=0, fill=2016, color=0)Configure a window region for scrolling:
win is the window id to configure. There are 0..7 standard windows for general purpose use. Window 8 is the text scroll window (the ticker).
x, y, w, h specify the location of the window in the display.
vec specifies the direction and speed of scroll: it is a 16-bit value of the form
0bF.ddSSSSSSSSSSSS. dd is 0, 1, 2, 3 for +x, +y, -x, -y scrolling. F sets the speed format, with 0 meaning that the window is shifted S % 256 pixel every frame, and 1 meaning that the window is shifted 1 pixel every S frames.pat is a 16-bit pattern mask for the background.
fill is the fill color.
color is the extra color, either of the text or pattern foreground.
LCD160CR.set_scroll_win_param(win, param, value)Set a single parameter of a scrolling window region:
win is the window id, 0..8.
param is the parameter number to configure, 0..7, and corresponds to the parameters in the
set_scroll_winmethod.value is the value to set.
LCD160CR.set_scroll_buf(s)Set the string for scrolling in window 8. The parameter s must be a string with length 32 or less.
LCD160CR.jpeg(buf)Display a JPEG. buf should contain the entire JPEG data. JPEG data should
not include EXIF information. The following encodings are supported: Baseline
DCT, Huffman coding, 8 bits per sample, 3 color components, YCbCr4:2:2.
The origin of the JPEG is set by LCD160CR.set_pos().
LCD160CR.jpeg_start(total_len)LCD160CR.jpeg_data(buf)Display a JPEG with the data split across multiple buffers. There must be
a single call to jpeg_start to begin with, specifying the total number of
bytes in the JPEG. Then this number of bytes must be transferred to the
display using one or more calls to the jpeg_data command.
LCD160CR.feed_wdt()The first call to this method will start the display’s internal watchdog timer. Subsequent calls will feed the watchdog. The timeout is roughly 30 seconds.
LCD160CR.reset()Reset the display.
lcd160cr.PORTRAITlcd160cr.LANDSCAPElcd160cr.PORTRAIT_UPSIDEDOWNlcd160cr.LANDSCAPE_UPSIDEDOWNOrientations of the display, used by LCD160CR.set_orient().
lcd160cr.STARTUP_DECO_NONElcd160cr.STARTUP_DECO_MLOGOlcd160cr.STARTUP_DECO_INFOTypes of start-up decoration, can be OR’ed together, used by
LCD160CR.set_startup_deco().
