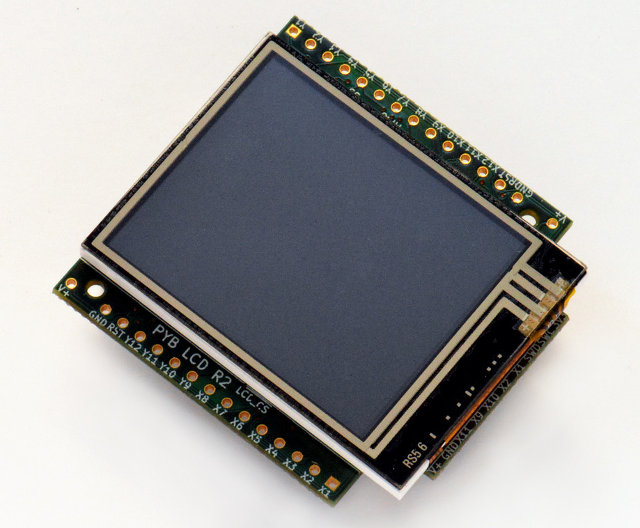
I have created an image in JPG with 160x128 Pixels, 144 dpi and 24 Bitdepth. But with every exporting try in GIMP it can't be read. This is the Code in Python:
path_startImage='/home/pi/logo.jpg' with open(path_startImage,'rb') as f: logo=f.read()
Now I finally have found a solution. It seems GIMP (and other tools) are putting too much info into the jpeg and the LCD160CR can't read it correctly.
Steps I have done:
sudo apt-get install libjpeg-turbo-progs
jpegtran logo.jpg > logo_opt.jpg
Changed the path_startImage to the new logo: path_startImage='/home/pi/logo_opt.jpg'
I am running an DietPi (downloaded on dietpi -> NanoPi Air) on a NanoPi Air. These are the huddles I had:
Theme: UART2 and i2c0
Afer reading and reading and reading the web, there was one simple solution. And I mean really simple!!
Error: serial.serialutil.SerialException: Could not configure port: (5, 'Input/output error')
connected to the SSH:
sudo vim /boot/armbianEnv.txt
and changed this line:
overlays=usbhost2 usbhost3 uart2 i2c0
Theme: GPIO with python3
After trying to use RPi.GPIO or NPi.GPIO or RPi.GPIO_NP or whatever, I always got the error that my NanoPi Air isn't a Raspberry or with the NPi.GPIO not an NanoPI device. Which is really strange.
Error Message:
RuntimeError: This module can only be run on a Raspberry Pi!
RuntimeError: This module can only be run on a NanoPi!
3. Test installation. Run python console and try to import RPi.GPIO
python
>>> import RPi.GPIO as GPIO
if above command didn't throw error everything should be ok.
If you received:
File "<stdin>", line 1, in <module>
ImportError: No module named 'RPi.GPIO'
try:
>>> import RPi._GPIO
If you still get error something went wrong. Try to reboot and check if import works OK.
5. Run your first python code using GPIO:
create file test.py:
nano ./test.py
paste following code:
#!/usr/bin/python3
import RPi.GPIO as GPIO
import time
led = 12
GPIO.setmode(GPIO.BOARD)
GPIO.setwarnings(False)
GPIO.setup(led,GPIO.OUT)
i=0
while i<10:
print("LED on")
time.sleep(1)
print("LED off")
GPIO.output(led,GPIO.LOW)
time.sleep(1)
i=i+1
save file with ctrl+x and run the code:
sudo ./test.py
please remeber /dev/mem is writeprotected under Armbian and only root can access this device. This feature prevents anyone (even those in kmem group) to access GPIO ports! Original RPi.GPIO library under raspbian use /dev/gpiomem that allow anyone access to gpio memory connected to GPIO and forbids access to other addresses. At the moment there is no solution to freely access GPIO ports.
Tip Run vimtutor in a terminal to learn the first Vim commands.
Cursor movement
h - move cursor left
j - move cursor down
k - move cursor up
l - move cursor right
H - move to top of screen
M - move to middle of screen
L - move to bottom of screen
w - jump forwards to the start of a word
W - jump forwards to the start of a word (words can contain punctuation)
e - jump forwards to the end of a word
E - jump forwards to the end of a word (words can contain punctuation)
b - jump backwards to the start of a word
B - jump backwards to the start of a word (words can contain punctuation)
% - move to matching character (default supported pairs: '()', '{}', '[]' - use :h matchpairs in vim for more info)
0 - jump to the start of the line
^ - jump to the first non-blank character of the line
$ - jump to the end of the line
g_ - jump to the last non-blank character of the line
gg - go to the first line of the document
G - go to the last line of the document
5gg or 5G - go to line 5
fx - jump to next occurrence of character x
tx - jump to before next occurrence of character x
Fx - jump to previous occurence of character x
Tx - jump to after previous occurence of character x
; - repeat previous f, t, F or T movement
, - repeat previous f, t, F or T movement, backwards
} - jump to next paragraph (or function/block, when editing code)
{ - jump to previous paragraph (or function/block, when editing code)
zz - center cursor on screen
Ctrl + e - move screen down one line (without moving cursor)
Ctrl + y - move screen up one line (without moving cursor)
Ctrl + b - move back one full screen
Ctrl + f - move forward one full screen
Ctrl + d - move forward 1/2 a screen
Ctrl + u - move back 1/2 a screen
Tip
Prefix a cursor movement command with a number to repeat it. For example, 4j moves down 4 lines.
Insert mode - inserting/appending text
i - insert before the cursor
I - insert at the beginning of the line
a - insert (append) after the cursor
A - insert (append) at the end of the line
o - append (open) a new line below the current line
O - append (open) a new line above the current line
ea - insert (append) at the end of the word
Ctrl + h - delete the character before the cursor during insert mode
Ctrl + w - delete word before the cursor during insert mode
Ctrl + j - begin new line during insert mode
Ctrl + t - indent (move right) line one shiftwidth during insert mode
Ctrl + d - de-indent (move left) line one shiftwidth during insert mode
Ctrl + n - insert (auto-complete) next match before the cursor during insert mode
Ctrl + p - insert (auto-complete) previous match before the cursor during insert mode
Ctrl + rx - insert the contents of register x
Esc - exit insert mode
Editing
r - replace a single character
J - join line below to the current one with one space in between
gJ - join line below to the current one without space in between
gwip - reflow paragraph
g~ - switch case up to motion
gu - change to lowercase up to motion
gU - change to uppercase up to motion
cc - change (replace) entire line
C - change (replace) to the end of the line
c$ - change (replace) to the end of the line
ciw - change (replace) entire word
cw - change (replace) to the end of the word
s - delete character and substitute text
S - delete line and substitute text (same as cc)
xp - transpose two letters (delete and paste)
u - undo
U - restore (undo) last changed line
Ctrl + r - redo
. - repeat last command
Marking text (visual mode)
v - start visual mode, mark lines, then do a command (like y-yank)
V - start linewise visual mode
o - move to other end of marked area
Ctrl + v - start visual block mode
O - move to other corner of block
aw - mark a word
ab - a block with ()
aB - a block with {}
at - a block with <> tags
ib - inner block with ()
iB - inner block with {}
it - inner block with <> tags
Esc - exit visual mode
Tip Instead of b or B one can also use ( or { respectively.
Visual commands
> - shift text right
< - shift text left
y - yank (copy) marked text
d - delete marked text
~ - switch case
u - change marked text to lowercase
U - change marked text to uppercase
Registers
:reg[isters] - show registers content
"xy - yank into register x
"xp - paste contents of register x
"+y - yank into the system clipboard register
"+p - paste from the system clipboard register
Tip Registers are being stored in ~/.viminfo, and will be loaded again on next restart of vim.
Tip Special registers:
0 - last yank " - unnamed register, last delete or yank % - current file name # - alternate file name * - clipboard contents (X11 primary) + - clipboard contents (X11 clipboard) / - last search pattern : - last command-line . - last inserted text - - last small (less than a line) delete = - expression register _ - black hole register
Marks and positions
:marks - list of marks
ma - set current position for mark A
`a - jump to position of mark A
y`a - yank text to position of mark A
`0 - go to the position where Vim was previously exited
`" - go to the position when last editing this file
`. - go to the position of the last change in this file
`` - go to the position before the last jump
:ju[mps] - list of jumps
Ctrl + i - go to newer position in jump list
Ctrl + o - go to older position in jump list
:changes - list of changes
g, - go to newer position in change list
g; - go to older position in change list
Ctrl + ] - jump to the tag under cursor
Tip To jump to a mark you can either use a backtick (`) or an apostrophe ('). Using an apostrophe jumps to the beginning (first non-black) of the line holding the mark.
Macros
qa - record macro a
q - stop recording macro
@a - run macro a
@@ - rerun last run macro
Cut and paste
yy - yank (copy) a line
2yy - yank (copy) 2 lines
yw - yank (copy) the characters of the word from the cursor position to the start of the next word
y$ - yank (copy) to end of line
p - put (paste) the clipboard after cursor
P - put (paste) before cursor
dd - delete (cut) a line
2dd - delete (cut) 2 lines
dw - delete (cut) the characters of the word from the cursor position to the start of the next word
D - delete (cut) to the end of the line
d$ - delete (cut) to the end of the line
x - delete (cut) character
Indent text
>> - indent (move right) line one shiftwidth
<< - de-indent (move left) line one shiftwidth
>% - indent a block with () or {} (cursor on brace)
>ib - indent inner block with ()
>at - indent a block with <> tags
3== - re-indent 3 lines
=% - re-indent a block with () or {} (cursor on brace)
=iB - re-indent inner block with {}
gg=G - re-indent entire buffer
]p - paste and adjust indent to current line
Exiting
:w - write (save) the file, but don't exit
:w !sudo tee % - write out the current file using sudo
:wq or :x or ZZ - write (save) and quit
:q - quit (fails if there are unsaved changes)
:q! or ZQ - quit and throw away unsaved changes
:wqa - write (save) and quit on all tabs
Search and replace
/pattern - search for pattern
?pattern - search backward for pattern
\vpattern - 'very magic' pattern: non-alphanumeric characters are interpreted as special regex symbols (no escaping needed)
n - repeat search in same direction
N - repeat search in opposite direction
:%s/old/new/g -
replace all old with new throughout file
:%s/old/new/gc -
replace all old with new throughout file with confirmations
:noh[lsearch] - remove highlighting of search matches
Search in multiple files
:vim[grep] /pattern/ {`{file}`} -
search for pattern in multiple files
e.g.
:vim[grep] /foo/ **/*
:cn[ext] - jump to the next match
:cp[revious] - jump to the previous match
:cope[n] - open a window containing the list of matches
:ccl[ose] - close the quickfix window
Tabs
:tabnew or :tabnew {page.words.file} -
open a file in a new tab
Ctrl + wT - move the current split window into its own tab
gt or :tabn[ext] - move to the next tab
gT or :tabp[revious] - move to the previous tab
#gt - move to tab number #
:tabm[ove] # - move current tab to the #th position (indexed from 0)
:tabc[lose] - close the current tab and all its windows
:tabo[nly] - close all tabs except for the current one
:tabdo command - run the command on all tabs (e.g. :tabdo q - closes all opened tabs)
Working with multiple files
:e[dit] file - edit a file in a new buffer
:bn[ext] -
go to the next buffer
:bp[revious] -
go to the previous buffer
:bd[elete] - delete a buffer (close a file)
:b[uffer]# - go to a buffer by index #
:b[uffer] file - go to a buffer by file
:ls or :buffers - list all open buffers
:sp[lit] file - open a file in a new buffer and split window
:vs[plit] file - open a file in a new buffer and vertically split window
:vert[ical] ba[ll] - edit all buffers as vertical windows
:tab ba[ll] - edit all buffers as tabs
Ctrl + ws - split window
Ctrl + wv - split window vertically
Ctrl + ww - switch windows
Ctrl + wq - quit a window
Ctrl + wx - exchange current window with next one
Ctrl + w= - make all windows equal height & width
Ctrl + wh - move cursor to the left window (vertical split)
Ctrl + wl - move cursor to the right window (vertical split)
Ctrl + wj - move cursor to the window below (horizontal split)
Ctrl + wk - move cursor to the window above (horizontal split)
Diff
zf - manually define a fold up to motion
zd - delete fold under the cursor
za - toggle fold under the cursor
zo - open fold under the cursor
zc - close fold under the cursor
zr - reduce (open) all folds by one level
zm - fold more (close) all folds by one level
zi - toggle folding functionality
]c - jump to start of next change
[c - jump to start of previous change
do or :diffg[et] - obtain (get) difference (from other buffer)
dp or :diffpu[t] - put difference (to other buffer)
:diffthis - make current window part of diff
:dif[fupdate] - update differences
:diffo[ff] - switch off diff mode for current window
Tip The commands for folding (e.g. za) operate on one level. To operate on all levels, use uppercase letters (e.g. zA).
Tip To view the differences of files, one can directly start Vim in diff mode by running vimdiff in a terminal. One can even set this as git difftool.
This project aims to be one of the most accessible vim guides available. We
made sure to support mobile, desktop, and other
languages.
You can read about how to contribute (and help improve) by viewing our
README
. There you can see how to set up this project, or how to contribute a new
language. Here is a big thank you to our
contributors!
VORGEHEN ZUM AKTIVIEREN BZW. ÄNDERN DES PI ALS WLAN HOTSPOT:
Über serielles Terminal (USB-Kabel) auf pi einloggen. Falls WLAN Hotspot bereits existiert, dann mit dem PC sich damit verbinden und ein SSH Terminal Sitzung zum WLAN 192.168.8.1 verbinden. Dann die folgendes eingeben:
SSID und Passwort eingeben: default: SSID=sensor-xx PASSWORD=123456789
ALTERNATIVES VORGEHEN ZUM EINRICHTEN DES PI ALS CLIENT:
# Wifi Hotspot am PC einrichten # Über serielles Terminal auf pi einloggen, dann
1
2
sudo nmcli dev wifisudo nmcli dev wifi connect "SSID" password "PASSWORD" ifname wlan0
# die Einstellungen werden gespeichert und auch nach Neustart wird Verbindung aufgebaut.
FALLS SCHON MAL IN DEN NETZWERKEINSTELLUNGEN RUMGEFUSCHT WURDE:
1
sudo nmcli dev
#if the status of a device is "unmanaged" it means that device cannot be accessed by NetworkManager. To make it accessed you need to clear the settings under "/etc/network/interfaces" and reboot your system.
1
2
3
sudo nmcli r wifi onsudo nmcli dev wifisudo nmcli dev wifi connect "SSID" password "PASSWORD" ifname wlan0
At times you create a script and then you want to have the
scripts controlled by systemd or in some cases you wish to have the
scripts getting restarted by itself when it is killed due to some
reason. In such cases systemd in Linux helps to configure services which
can be managed. To do so follow the following steps.
1
cd /etc/systemd/system
Create a file named your-service.service and include the following:
1
2
3
4
5
6
7
8
9
10
11
[Unit]Description=<description about this service>[Service]User=<user e.g. root>WorkingDirectory=<directory_of_script e.g. /root>ExecStart=<script which needs to be executed>Restart=always[Install]WantedBy=multi-user.target
Reload the service files to include the new service.
The LCD160CR class provides an interface to the display. Create an
instance of this class and use its methods to draw to the LCD and get
the status of the touch panel.
class lcd160cr.LCD160CR(connect=None, *, pwr=None, i2c=None, spi=None, i2c_addr=98)
Construct an LCD160CR object. The parameters are:
connect is a string specifying the physical connection of the LCD
display to the board; valid values are “X”, “Y”, “XY”, “YX”.
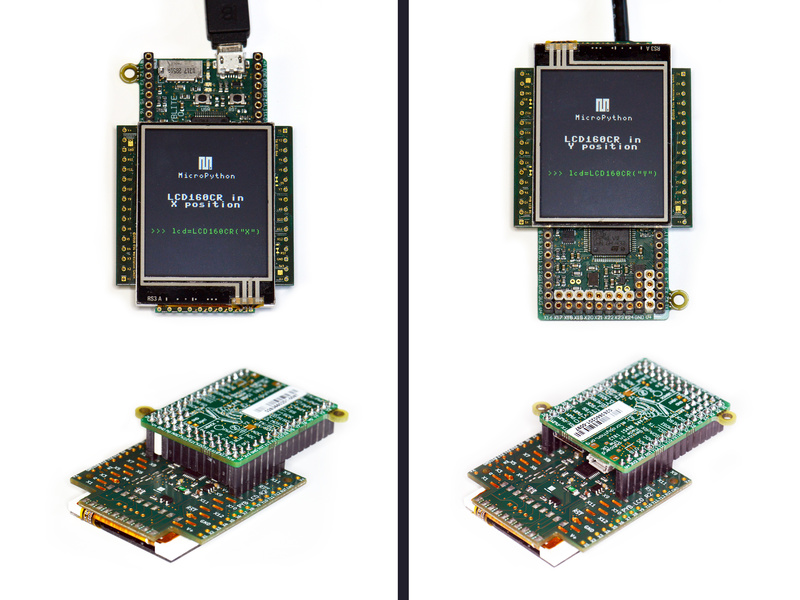
Use “X” when the display is connected to a pyboard in the X-skin
position, and “Y” when connected in the Y-skin position. “XY”
and “YX” are used when the display is connected to the right or
left side of the pyboard, respectively.
pwr is a Pin object connected to the LCD’s power/enabled pin.
i2c is an I2C object connected to the LCD’s I2C interface.
spi is an SPI object connected to the LCD’s SPI interface.
i2c_addr is the I2C address of the display.
One must specify either a valid connect or all of pwr, i2c and spi.
If a valid connect is given then any of pwr, i2c or spi which are
not passed as parameters (i.e. they are None) will be created based on the
value of connect. This allows to override the default interface to the
display if needed.
The default values are:
“X” is for the X-skin and uses:
pwr=Pin("X4"), i2c=I2C("X"), spi=SPI("X")
“Y” is for the Y-skin and uses:
pwr=Pin("Y4"), i2c=I2C("Y"), spi=SPI("Y")
“XY” is for the right-side and uses:
pwr=Pin("X4"), i2c=I2C("Y"), spi=SPI("X")
“YX” is for the left-side and uses:
pwr=Pin("Y4"), i2c=I2C("X"), spi=SPI("Y")
See this image
for how the display can be connected to the pyboard.
Static methods
static LCD160CR.rgb(r, g, b)
Return a 16-bit integer representing the given rgb color values. The
16-bit value can be used to set the font color (see
LCD160CR.set_text_color()) pen color (see LCD160CR.set_pen())
and draw individual pixels.
LCD160CR.clip_line(data, w, h):
Clip the given line data. This is for internal use.
Instance members
The following instance members are publicly accessible.
LCD160CR.w
LCD160CR.h
The width and height of the display, respectively, in pixels. These
members are updated when calling LCD160CR.set_orient() and should
be considered read-only.
Setup commands
LCD160CR.set_power(on)
Turn the display on or off, depending on the given value of on: 0 or False
will turn the display off, and 1 or True will turn it on.
Save the following parameters to flash so they persist on restart and power up:
initial decoration, orientation, brightness, UART baud rate, I2C address.
Pixel access methods
The following methods manipulate individual pixels on the display.
LCD160CR.set_pixel(x, y, c)
Set the specified pixel to the given color. The color should be a 16-bit
integer and can be created by LCD160CR.rgb().
LCD160CR.get_pixel(x, y)
Get the 16-bit value of the specified pixel.
LCD160CR.get_line(x, y, buf)
Low-level method to get a line of pixels into the given buffer.
To read n pixels buf should be 2*n+1 bytes in length. The first byte
is a dummy byte and should be ignored, and subsequent bytes represent the
pixels in the line starting at coordinate (x, y).
Dump the contents of the screen to the given buffer. The parameters x and y
specify the starting coordinate, and w and h the size of the region. If w
or h are None then they will take on their maximum values, set by the size
of the screen minus the given x and y values. buf should be large enough
to hold 2*w*h bytes. If it’s smaller then only the initial horizontal lines
will be stored.
LCD160CR.screen_load(buf)
Load the entire screen from the given buffer.
Drawing text
To draw text one sets the position, color and font, and then uses
LCD160CR.write to draw the text.
LCD160CR.set_pos(x, y)
Set the position for text output using LCD160CR.write(). The position
is the upper-left corner of the text.
LCD160CR.set_text_color(fg, bg)
Set the foreground and background color of the text.
Set the font for the text. Subsequent calls to write will use the newly
configured font. The parameters are:
font is the font family to use, valid values are 0, 1, 2, 3.
scale is a scaling value for each character pixel, where the pixels
are drawn as a square with side length equal to scale + 1. The value
can be between 0 and 63.
bold controls the number of pixels to overdraw each character pixel,
making a bold effect. The lower 2 bits of bold are the number of
pixels to overdraw in the horizontal direction, and the next 2 bits are
for the vertical direction. For example, a bold value of 5 will
overdraw 1 pixel in both the horizontal and vertical directions.
trans can be either 0 or 1 and if set to 1 the characters will be
drawn with a transparent background.
scroll can be either 0 or 1 and if set to 1 the display will do a
soft scroll if the text moves to the next line.
LCD160CR.write(s)
Write text to the display, using the current position, color and font.
As text is written the position is automatically incremented. The
display supports basic VT100 control codes such as newline and backspace.
Drawing primitive shapes
Primitive drawing commands use a foreground and background color set by the
set_pen method.
LCD160CR.set_pen(line, fill)
Set the line and fill color for primitive shapes.
LCD160CR.erase()
Erase the entire display to the pen fill color.
LCD160CR.dot(x, y)
Draw a single pixel at the given location using the pen line color.
LCD160CR.rect(x, y, w, h)
LCD160CR.rect_outline(x, y, w, h)
LCD160CR.rect_interior(x, y, w, h)
Draw a rectangle at the given location and size using the pen line
color for the outline, and the pen fill color for the interior.
The rect method draws the outline and interior, while the other methods
just draw one or the other.
LCD160CR.line(x1, y1, x2, y2)
Draw a line between the given coordinates using the pen line color.
LCD160CR.dot_no_clip(x, y)
LCD160CR.rect_no_clip(x, y, w, h)
LCD160CR.rect_outline_no_clip(x, y, w, h)
LCD160CR.rect_interior_no_clip(x, y, w, h)
LCD160CR.line_no_clip(x1, y1, x2, y2)
These methods are as above but don’t do any clipping on the input
coordinates. They are faster than the clipping versions and can be
used when you know that the coordinates are within the display.
LCD160CR.poly_dot(data)
Draw a sequence of dots using the pen line color.
The data should be a buffer of bytes, with each successive pair of
bytes corresponding to coordinate pairs (x, y).
If calib is True then the call will trigger a touch calibration of
the resistive touch sensor. This requires the user to touch various
parts of the screen.
If save is True then the touch parameters will be saved to NVRAM
to persist across reset/power up.
If irq is True then the display will be configured to pull the IRQ
line low when a touch force is detected. If irq is False then this
feature is disabled. If irq is None (the default value) then no
change is made to this setting.
LCD160CR.is_touched()
Returns a boolean: True if there is currently a touch force on the screen,
False otherwise.
LCD160CR.get_touch()
Returns a 3-tuple of: (active, x, y). If there is currently a touch force
on the screen then active is 1, otherwise it is 0. The x and y values
indicate the position of the current or most recent touch.
Advanced commands
LCD160CR.set_spi_win(x, y, w, h)
Set the window that SPI data is written to.
LCD160CR.fast_spi(flush=True)
Ready the display to accept RGB pixel data on the SPI bus, resetting the location
of the first byte to go to the top-left corner of the window set by
LCD160CR.set_spi_win().
The method returns an SPI object which can be used to write the pixel data.
Pixels should be sent as 16-bit RGB values in the 5-6-5 format. The destination
counter will increase as data is sent, and data can be sent in arbitrary sized
chunks. Once the destination counter reaches the end of the window specified by
LCD160CR.set_spi_win() it will wrap around to the top-left corner of that window.
LCD160CR.show_framebuf(buf)
Show the given buffer on the display. buf should be an array of bytes containing
the 16-bit RGB values for the pixels, and they will be written to the area
specified by LCD160CR.set_spi_win(), starting from the top-left corner.
The framebuf module can be used to construct frame buffers
and provides drawing primitives. Using a frame buffer will improve
performance of animations when compared to drawing directly to the screen.
LCD160CR.set_scroll(on)
Turn scrolling on or off. This controls globally whether any window regions will
scroll.
win is the window id to configure. There are 0..7 standard windows for
general purpose use. Window 8 is the text scroll window (the ticker).
x, y, w, h specify the location of the window in the display.
vec specifies the direction and speed of scroll: it is a 16-bit value
of the form 0bF.ddSSSSSSSSSSSS. dd is 0, 1, 2, 3 for +x, +y, -x,
-y scrolling. F sets the speed format, with 0 meaning that the window
is shifted S % 256 pixel every frame, and 1 meaning that the window
is shifted 1 pixel every S frames.
pat is a 16-bit pattern mask for the background.
fill is the fill color.
color is the extra color, either of the text or pattern foreground.
LCD160CR.set_scroll_win_param(win, param, value)
Set a single parameter of a scrolling window region:
win is the window id, 0..8.
param is the parameter number to configure, 0..7, and corresponds
to the parameters in the set_scroll_win method.
value is the value to set.
LCD160CR.set_scroll_buf(s)
Set the string for scrolling in window 8. The parameter s must be a string
with length 32 or less.
LCD160CR.jpeg(buf)
Display a JPEG. buf should contain the entire JPEG data. JPEG data should
not include EXIF information. The following encodings are supported: Baseline
DCT, Huffman coding, 8 bits per sample, 3 color components, YCbCr4:2:2.
The origin of the JPEG is set by LCD160CR.set_pos().
LCD160CR.jpeg_start(total_len)
LCD160CR.jpeg_data(buf)
Display a JPEG with the data split across multiple buffers. There must be
a single call to jpeg_start to begin with, specifying the total number of
bytes in the JPEG. Then this number of bytes must be transferred to the
display using one or more calls to the jpeg_data command.
LCD160CR.feed_wdt()
The first call to this method will start the display’s internal watchdog
timer. Subsequent calls will feed the watchdog. The timeout is roughly 30
seconds.
Aktuelle Versionen von Fedora, OpenSuse, Mandriva und einigen
anderen Distributionen starten das System bereits mit Systemd. Das neue
Init-System bringt eigene Werkzeuge zur Konfiguration und Diagnose mit
und erfordert andere Kniffe als Sysvinit, wenn es Probleme gibt.
Das neue Init-Tool Systemd
liegt schon mehreren Distributionen als Alternative zu Upstart oder dem
angestaubten Sysvinit bei. Einige von Sysvinit- und
Upstart-Distributionen gewohnte Kommandos und Tricks arbeiten durch
Kompatibilitätsmaßnahmen auch unter Systemd. Um die Fähigkeiten von
Systemd richtig zu nutzen, sollte der Administrator allerdings auch
Werkzeuge und Parameter von Systemd kennen.
Wichtigstes Tool zur Interaktion mit Systemd ist das
Kommandozeilenprogramm systemctl. Für Änderungen an der Konfiguration
oder den Neustart von Hintergrunddiensten erfordert es Root-Rechte;
einige Diagnose-Aufrufe dürfen auch einfache Anwender ausführen. Wer das
Programm ohne jegliche Parameter aufruft, erhält eine Liste der
"Units", die beim Systemstart anfallende Aufgaben erledigen. Dazu gehört
neben dem Einbinden und Prüfen von Datenträgern auch das Starten von
Hintergrunddiensten oder das Einrichten von Hardware.
Bei einer Standardinstallation von Fedora 16 listet Systemctl rund
hundertsechzig aktive Units in zehn verschiedenen Spielarten. Zu den
wichtigsten zählen Service-Units. Sie kümmern sich um
Hintergrunddienste, die eine Sysvinit-Distribution typischerweise über
Init-Skripte startet. Mount- und Automount-Units binden Dateisysteme
ein. Socket-Units legen Sockets an; sie starten indirekt über
Abhängigkeiten einen andere Unit, sobald auf den Socket zugegriffen
wird. (Eine detaillierte Erläuterung des Unit-Konzepts finden Sie im
ersten Teil des Artikels.)
Über einen Parameter kann man Systemctl anweisen, nur Units eines bestimmten Typs aufzulisten, etwa alle Service-Units:
systemctl --type=service
Systemctl leitet seine Ausgabe automatisch an less weiter; über die
Pfeiltasten lässt sich nicht nur hoch- und runterscrollen, sondern auch
nach rechts, denn dort verbergen sich manchmal weitere Informationen.
Den Systemstart erledigt Systemd mit Units. Die gibt es in
verschiedenen Spielarten, die Systemctl separat auflisten kann.
In der ersten Spalte der Ausgabe findet sich der Unit-Name. Die
zweite Spalte gibt an, ob Systemd die Unit-Definition laden konnte, die
dritte, ob die Unit aktiv ist. Inaktive – installierte, aber nicht zum
Start vorgesehene – Units gibt das Programm nur mit dem Schalter -a aus; dasselbe gilt für Units, die das Init-System etwa aufgrund eines Fehlers in der Unit-Datei nicht laden konnte.
Spalte vier liefert den aktuellen Status. "exited" zeigt an, dass
sich der Prozess ohne Fehler beendet hat. Das ist zum Beispiel bei
Diensten der Fall, die im Hintergrund weiterlaufen – etwa bei der
Service-Unit, die aus Kompatibilitätsgründen die von Sysvinit bekannte
Datei /etc/rc.local beim Systemstart ausführt. "running" steht bei
Diensten, die im Hintergrund laufen: cron, dbus, sshd, udev und andere.
In der fünften Spalte folgt eine Beschreibung der Unit. Wenn sie mit
"LSB" oder "SYSV" beginnt, hat Systemd die Unit automatisch erzeugt, um
ein traditionelles Init-Skript abzuarbeiten.
Bei Diensten, die nicht gestartet werden konnten oder später
abgestürzt sind, steht in der vierten Spalte "failed" – rot
hervorgehoben, sofern die Konsole farbige Ausgabe beherrscht. Das status-Kommando von sytemctl gibt den Zeitpunkt des Abbruchs und den zurückgelieferten Fehlercode des Programms aus, beispielsweise
systemctl status NetworkManager.service
Das Status-Kommando von Systemctl liefert Abbruchzeit und Fehlercode abgestürzter Dienste.
Bei einem frisch installierten Fedora 16 listet Systemctl um die 60
Service-Units auf. Darunter sind auch die Login-Prozesse für die
Textkonsolen (agetty), denn anders als Sysvinit handhabt Systemd diese
über Service-Units wie einen normalen Hintergrunddienst.
Units ...
Die Konfigurationsdateien zum Erzeugen der Units, die Systemd
mitbringt, liegen in /lib/systemd/system/; eine gleichnamige Datei in
/etc/systemd/system/ hat jedoch Vorrang.
Unit-Definition sind meist deutlich kürzer als die klassischen
Sys-V-Init-Skripte. Eine Unit-Datei für den Dienst zur
Netzwerkzeit-Synchronisierung via NTP ist nur wenige Zeilen lang:
Alle Unit-Dateien enthalten einen durch [Unit] eingeleiteten Abschnitt mit allgemeinen Einstellungen, darunter eine kurze Beschreibung. Im Abschnitt [Service]
folgen dienstspezifische Angaben; bei NTP ist das lediglich das
Kommando, um den Dienst zu starten. Falls ein spezieller Befehl zum
Beenden nötig ist, kann man diesen über eine ExecStop-Anweisung
festlegen. Beim NTP-Daemon ist das unnötig, weil er sich in guter
Unix-Tradition durch ein SIGTERM-Signal beenden lässt; das sendet
Systemd zum Beenden, wenn kein anderer Befehl spezifiziert ist.
Der Abschnitt [Install] enthält
Anweisungen, die Systemd bei der (De-)Installation interpretiert; der
Eintrag im NTP-Beispiel bedeutet, dass die Zeitsynchronisation beim
Ansteuern des Targets "Multi-User" aufgerufen werden soll.
... und Targets
Die Targets-Units bieten ein Konzept, das den Runlevels von Sysvinit
ähnelt; aus Kompatibilitätsgründen versteht Systemd sogar die
Runlevel-Namen zur Ansteuerung äquivalenter Targets. Wie gewohnt kann
man daher bei Fedora 16 dem Kernel im Boot-Loader den Parameter single mitgeben; Systemd steuert daraufhin rescue.target an, das eine minimale, dem Single-User-Modus entsprechende Umgebung bietet.
Auch 3 funktioniert, um den Multi-User-Modus ohne
grafischen Anmeldemanager anzusteuern. Repräsentiert wird dieser Modus
in Systemd durch die Target-Unit multi-user. Um multi-user.target zum Standard zu machen, reicht ein Links:
Soll der grafische Anmeldemanager später doch wieder standardmäßig starten, kann man auf die gleiche Weise graphical.target
zum Standardziel erheben; es ist das Äquivalent zum Runlevel 5 von
Fedora und OpenSuse. Alternativ zu den alten Runlevel-Bezeichnungen kann
man dem Kernel auch die Namen der zu startenden Target-Unit mitgeben:
systemd.unit=multi-user.target
Um im Betrieb eine andere Target-Unit anzusteuern, dient das isolate-Kommando von Systemctl:
systemctl isolate rescue.target
Der Wechsel in das Rescue-Target ist für Administrationsaufgaben
interessant, denn dabei beendet Systemd alle User-Logins und
Hintergrunddienste, sodass nur noch Systemdienste laufen – etwa jene zur
Überwachung von Logical Volumes (lvm2-monitor). Manchmal müssen auch
diese für Umbauten heruntergefahren werden, was mit dem Notfall-Modus emergency.target gelingt; hier laufen nur noch die Kernel-Threads.
Abhängigkeiten
Verlangen
Das show-Kommando von Systemctl liefert einige Interna
zu den laufenden Units und den über sie ausgeführten Arbeiten. Mit ihm
lässt sich auch ausgeben, welche Units Systemd beim Ansteuern des
Multi-User-Targets aufruft:
systemctl show -p Wants multi-user.target
In der Ausgabe können sich andere Targets finden – beim multi-user.target etwa basic.target. Das wiederum hängt vom sysinit.target ab, das local-fs.target
voraussetzt. Diese drei Targets kümmern sich um die Grundeinrichtung
des Systems; dazu zählen das Einbinden der Dateisysteme und der Start
von Udev. Zum Spezifizieren der Abhängigkeit vom Basic-Target enthält
die Unit-Konfigurationsdatei multi-user.target folgende Angaben:
Requires=basic.target
After=basic.target
Durch die After-Angabe erfährt Systemd, dass es das
Target nicht nur aufrufen, sondern auch den seinen vollständigen Start
abwarten muss. Neben Requires gibt es auch noch das schwächere Wants. Darüber angegebene Units ruft Systemd ebenfalls auf, setzt den Start aber auch fort, wenn eine von ihnen nicht startet.
Diese Art der Abhängigkeit lässt sich auch über Links zu Unit-Dateien
spezifizieren, die in einem Verzeichnis angelegt werden, dessen Name
sich aus dem Namen der target-Unit und angehängtem .wants
zusammensetzen, etwa
.../systemd/system/multi-user.target.wants/
Ausknipsen
Wer die NTPD-Service-Unit deaktivieren will, damit die Systemzeit
beim Booten nicht via NTP synchronisiert wird, kann das folgenden Befehl
tun:
systemctl disable ntpd.service
Dabei macht Systemctl nichts anderes, als den Link auf die
Service-Unit-Datei in den Wants-Verzeichnissen zu entfernen; beim
Aktivieren eines Dienstes mit enable erstellt das Tool einen Link. Beides kann man auch manuell tun, um Units zu (de)aktiviern.
Wird ein Dienst nicht von einer Unit, sondern über ein traditionelles
Init-Skript gestartet, leitet Systemctl die Aufforderung zum Aktivieren
an das Programm chkconfig weiter. Bei Fedora ist das etwa der Fall, wenn man Apache installiert und via Systemctl aktiviert.
Das (De)Aktivieren eines Dienstes wirkt sich erst beim nächsten Start
oder Beenden des Systems aus. Folgendes Kommando startet einen Dienst
einmalig sofort:
systemctl start ntpd.service
Der Parameter stop beendet den Dienst. Mit dem Kommando status
liefert Systemctl Information über die Unit, darunter ihren derzeitigen
Zustand und den Namen der sie spezifizierenden Datei. Zudem gibt das
Programm aus, ob und wie lange der Dienst bereits läuft und welche
Prozesse zu ihm gehören; den Hauptprozess weist Systemctl dabei explizit
aus.
Über die Gruppenzugehörigkeit lässt sich erkennen, zu welchem Dienst ein Prozess gehört.
Über die Zugehörigkeit zu den von Systemd angelegten Control Groups
lässt sich recht einfach herausfinden, welche Prozesse von welchem
Dienst gestartet wurden. Die von Systemd angelegte Cgroup-Hierarchie
gibt der Befehl systemd-cgls aus; alternativ zeigt ps die Gruppenzugehörigkeit an:
ps xaw -eo pid,args,cgroup
Abgesoffen
Falls beim Systemstart Probleme auftreten, an denen Systemd direkt
oder indirekt beteiligt scheint, sollten Sie dem Kernel die folgenden
Parameter im Boot-Loader mitgeben:
systemd.log_target=kmsg systemd.log_level=debug
Systemd schreibt dann ausführliche Informationen zur Fehlersuche auf
die Konsole und in den Puffer der Kernel-Meldungen, den man später mit dmesg auslesen kann.
Zu Systemd gehören die Kommandozeilenprogramme poweroff, halt und reboot;
alternativ kann man das System über die gleichlautenden
Systemctl-Kommandos herunterfahren oder neu starten. Einen Neustart
erreicht man auch mit dem Kommando
systemctl kexec
Das Werkzeug "systemd-cgls" kann die Control Groups und die ihnen zugeordneten Prozesse anzeigen.
Nach dem Stoppen aller Dienste weist Systemd den laufenden Kernel an,
einen zuvor konfigurierten Linux-Kernel direkt zu starten – ohne
BIOS-Selbsttest und Boot-Loader. Ist kein Kexec-Kernel konfiguriert,
erfolgt ein normaler Neustart.
Ranholen
Bei gängigen Administrationsaufgaben kommt man nur mit den Service-
und Target-Units direkt in Kontakt; die anderen Units sind vor allem für
spezielle Funktionen von Systemd wichtig oder erledigen beim
Systemstart all jene Dinge, um die sich bei Sysvinit- und
Upstart-Distributionen distributionsspezifische Skripte gekümmert haben.
Dazu gehört etwa das Einbinden der in /etc/fstab spezifizierten
Dateisysteme, das Aktivieren von Auslagerungsspeicher oder das
gelegentliche Aufräumen des /tmp-Verzeichnisses.
Für einige dieser Arbeiten bringt Systemd eine Automount-Funktion
mit, die Pseudo-Einhängepunkte für in /etc/fstab konfigurierte
Dateisysteme anlegen kann; tatsächlich eingebunden werden sie allerdings
erst beim ersten Zugriff. Das Hinzufügen von "comment=systemd.automount"
in /etc/fstab verwandelt einen beliebigen Mount-Punkt in einen
Automount-Punkt. Das kann den Startvorgang beschleunigen und ist
beispielsweise für Netzwerkfreigaben nützlich, wenn die Netzverbindung
über den NetworkManager erst beim Einloggen eines Users aufgebaut wird.
Ursachenforschung
Über Systemctl kann man Systemd zum Senden eines Signals auffordern,
ohne die Prozess-ID des Dienstes zu kennen. Der folgende Befehl versetzt
Rsyslogd in den Debug-Modus; dieser wird beendet, wenn man den Befehl
ein zweites Mal aufruft:
systemctl kill --signal=USR1 rsyslogd.service
Wenn man die Angabe des zu sendenden Signals weglässt, schickt
Systemctl ein normales Term-Signal, woraufhin sich alle Prozesse beenden
sollten, die zu einem Dienst gehören.
Systemd bringt ein Programm mit, um den Startvorgang zu
visualisieren; die dunkelroten Bereiche weisen die Startphase von
Diensten aus.
Der Befehl systemd-analyze gibt aus, wie lange der
Systemstart gedauert hat und wie viel Zeit davon auf Kosten von Kernel,
Initramfs und die Einrichtung des Userlands durch Systemd entfallen. Der
Befehl systemd-analyze blame gibt die Startzeiten der
einzelnen Units aus. Zur genaueren Betrachtung des Boot-Prozesses kann
das Programm eine SVG-Datei erzeugen, die den Start der Units
visualisert:
systemd-analyze plot > plot.svg
Manchmal kommt man so Units auf die Spur, die den Systemstart stark
in die Länge ziehen. Einige Hinweise zur korrekten Interpretation dieser
Ergebnisse liefert der siebte Teil der Blog-Reihe "Systemd for
Administrators". Die bislang zwölf Teile umfassende Serie enthält auch
noch viele andere Tipps und Hinweise für den Praxiseinsatz vom Systemd: